Prep Time: 20 minutes
Fermentation Time: 3–4 weeks (minimum), up to 6 months for deeper flavor
Total Time: 3–4 weeks active fermentation
Difficulty: Easy
Intensity Level: Low (minimal hands-on effort; mostly passive fermentation time)
Introduction
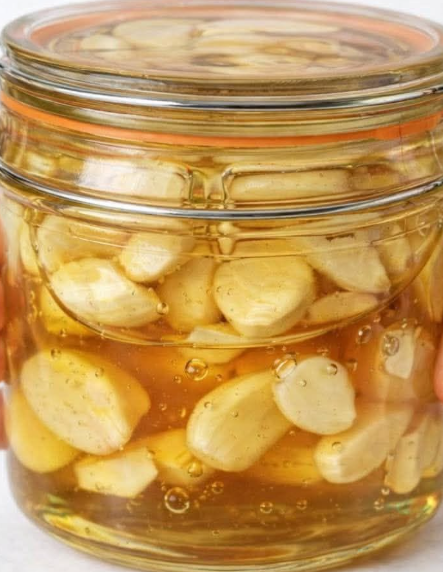
Fermented honey garlic is a centuries-old folk remedy and culinary treasure that transforms two simple ingredients into something magical. Raw garlic cloves submerged in raw honey undergo a natural fermentation process, creating a golden, infused honey with a mellow, sweet-savory garlic flavor and soft, tangy garlic cloves that are delicious on their own.
This recipe is beloved for its immune-supporting properties, versatility in the kitchen, and sheer simplicity. The honey becomes a flavorful drizzle for cheeses, roasted vegetables, meats, and cocktails, while the fermented garlic cloves can be eaten straight from the jar, mashed into dressings, or folded into sauces. Best of all, it requires just two ingredients and a little patience.
Ingredients
-
10–12 heads of fresh garlic (about 250–300 grams of peeled cloves)
-
2 cups (680 grams) raw, unfiltered honey — raw honey is essential, as its natural enzymes and moisture content drive the fermentation
-
Optional: 1 tablespoon apple cider vinegar (to increase acidity and safety margin, especially for beginners)
-
Optional flavor additions: a few sprigs of fresh thyme, rosemary, a pinch of red pepper flakes, or a cinnamon stick
Equipment:
-
1 clean pint-sized (500 ml) glass jar with a tight-fitting lid (sterilized)
-
Wooden spoon or fermentation weight (optional)
-
Clean hands or gloves
Instructions
Step 1: Prepare the Garlic (Intensity: Low | Time: 10–15 minutes)
Separate the garlic heads into individual cloves. Peel each clove carefully, removing any papery skins. Trim the root end if it is tough or dirty, and cut away any bruised or damaged spots. Leave smaller cloves whole and halve any very large cloves so they pack evenly. Set the peeled cloves aside.
Tip: Fresh, firm garlic works best. Avoid garlic that has begun to sprout, as sprouting garlic has a higher moisture content and can affect fermentation.
Step 2: Sterilize the Jar (Intensity: Low | Time: 5 minutes)
Wash your glass jar and lid thoroughly with hot soapy water, then rinse well. You can also sterilize it by pouring boiling water into the jar and letting it sit for a few minutes before drying. A clean jar is critical to prevent unwanted mold or bacterial growth.
Step 3: Pack the Jar (Intensity: Low | Time: 5 minutes)
Fill the sterilized jar with the peeled garlic cloves, leaving about 1 inch (2.5 cm) of headspace at the top. Pack them fairly tightly, but do not crush them. If using optional herbs or spices, tuck them in among the cloves now.
Step 4: Add the Honey (Intensity: Low | Time: 3–5 minutes)
Pour the raw honey over the garlic, filling the jar slowly to allow the honey to settle between the cloves. Fill until the garlic is completely submerged, leaving about ½ inch (1 cm) of headspace. If you are using the optional apple cider vinegar, stir it into the honey before pouring.
Important: The garlic must remain fully submerged beneath the honey to prevent spoilage. If cloves float, you can use a fermentation weight, a small clean glass, or a folded piece of parchment paper pressed down to keep them submerged.
Step 5: Seal and Begin Fermentation (Intensity: Low | Time: 5 minutes, then passive)
Wipe the rim of the jar clean, then screw on the lid tightly. Label the jar with the date. Place the jar in a cool, dark location (ideally 60–70°F / 15–21°C), such as a pantry shelf or kitchen cabinet.
Step 6: “Burp” the Jar Daily (Intensity: Low | Time: 1–2 minutes per day for the first 1–2 weeks)
Fermentation produces carbon dioxide gas. For the first 1–2 weeks, open the lid once daily to release pressure (“burping”), then reseal. You will likely see bubbles forming in the honey, and the honey will become thinner and more watery as it draws moisture from the garlic. This is normal and a sign fermentation is active.
Intensity note: After the first two weeks, you can reduce burping to every few days or as needed. Do not skip burping early on, as pressure can build quickly.
Step 7: Turn and Monitor (Intensity: Low | Time: 2 minutes, 2–3 times per week)
Occasionally turn the jar upside down and back to keep the garlic coated in honey and to redistribute the mixture. Check that the garlic remains submerged. If the honey level drops below the garlic, top up with additional raw honey.
Step 8: Ferment (Intensity: Passive | Time: 3–4 weeks minimum)
Allow the jar to sit for at least 3–4 weeks. The honey will become thinner, darker, and more fragrant, and the garlic will soften and turn slightly translucent. For a deeper, more complex flavor, continue fermenting for up to 3–6 months. The longer it ferments, the mellower and more tangy the garlic becomes.
Step 9: Taste and Refrigerate (Intensity: Low | Time: 5 minutes)
After 3–4 weeks, taste a clove. If the harsh bite of raw garlic has mellowed and the honey tastes sweet-savory with a slight tang, it is ready. Once fermentation has reached your desired flavor, transfer the jar to the refrigerator to slow the process. The fermented honey garlic will keep refrigerated for up to 12 months (and often longer).
Recipe Notes and Tips
-
Use raw honey: Pasteurized honey has been heated and may not ferment properly. Raw honey contains natural yeasts and enzymes that drive fermentation.
-
Keep garlic submerged: Exposure to air is the main cause of mold. Press garlic down regularly and top up with honey as needed.
-
Watch for mold: White film or bubbles are normal. Fuzzy mold on the surface or garlic is not — discard the batch if mold appears.
-
Botulism caution: Garlic in oil or honey can pose a risk if improperly handled. The acidic environment created by fermentation and honey generally inhibits harmful bacteria, but always use clean equipment, keep garlic submerged, and refrigerate after fermentation. People with compromised immune systems, pregnant women, and young children should consult a healthcare provider before consuming homemade fermented foods.
-
Flavor variations: Add chili flakes for heat, rosemary for earthiness, or a cinnamon stick for warmth. Add flavorings at the start of fermentation for best infusion.
Serving Suggestions
-
Drizzle the honey over roasted carrots, Brussels sprouts, or squash.
-
Whisk into salad dressings or marinades for chicken and pork.
-
Spoon over soft cheeses, such as brie or goat cheese, with crusty bread.
-
Stir into hot tea or cocktails for a savory-sweet note.
-
Eat the fermented cloves whole or mash them into butter, sauces, and dressings.
Nutrition Information (Approximate)
Serving Size: 1 tablespoon honey with 1 garlic clove
| Nutrient | Amount (approx.) |
|---|---|
| Calories | 65 |
| Total Fat | 0 g |
| Sodium | 1 mg |
| Total Carbohydrates | 17 g |
| Sugars | 16 g |
| Protein | 0.2 g |
| Vitamin C | 2% DV |
| Iron | 1% DV |