Prep Time: 20 minutes
Cook Time: 5 minutes
Chill Time: 24 hours (minimum)
Total Time: 24 hours 25 minutes
Difficulty: Easy
Description
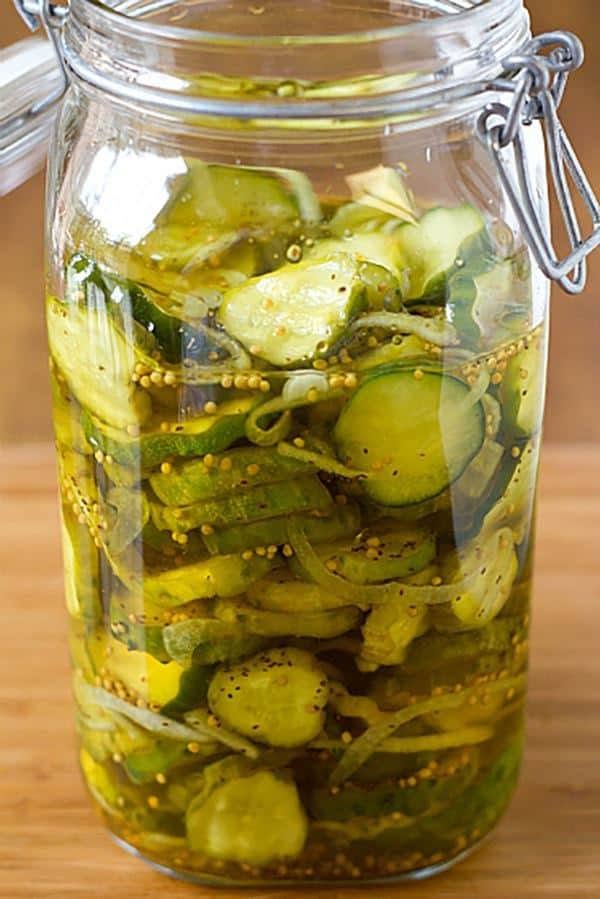
Refrigerator bread and butter pickles are the crisp, tangy, sweet-and-savory pickles that make a sandwich sing and a burger unforgettable. Unlike traditional canned pickles that require water-bath processing, these pickles are made with a hot brine poured over fresh cucumber slices and stored right in the fridge. The result is a bright, crunchy pickle with the classic bread-and-butter flavor profile — sweet, sour, and just a hint of spice — that’s ready in about a day and keeps for weeks. No canning equipment, no special skills, and no preservatives required. Just cucumbers, onions, vinegar, sugar, and a handful of spices.
This recipe uses Kirby or Persian cucumbers for maximum crunch, thin-sliced sweet onions for a mellow backdrop, and a brine balanced with apple cider vinegar, granulated sugar, and a touch of turmeric (which gives bread-and-butter pickles their signature golden hue). It’s the perfect beginner pickle and a reliable way to use up a bumper crop of summer cucumbers.
Ingredients
For the Pickles
-
1½ pounds Kirby cucumbers (about 6–8 small cucumbers), or Persian cucumbers
-
1 medium sweet onion (Vidalia or Walla Walla), halved and thinly sliced
-
1 tablespoon kosher salt (or pickling salt; do not use table salt with iodine)
-
1 cup ice cubes (for the salt-water soak)
For the Brine
-
1 cup apple cider vinegar (5% acidity)
-
¾ cup granulated sugar
-
¼ cup water
-
1 teaspoon yellow mustard seeds
-
½ teaspoon celery seeds
-
½ teaspoon ground turmeric
-
¼ teaspoon red pepper flakes (optional, for a little heat)
-
¼ teaspoon whole black peppercorns
-
1 small bay leaf
-
1 clove garlic, smashed (optional)
Equipment
-
Chef’s knife and cutting board
-
Colander
-
Medium saucepan
-
Whisk or spoon
-
1-quart glass jar with lid (or two pint jars), sterilized
-
Measuring cups and spoons
Instructions
Step 1: Slice the Cucumbers and Onions (10 minutes | Low intensity)
Wash the cucumbers thoroughly and pat dry. Trim off the blossom end (the end opposite the stem) — this end contains enzymes that can make pickles soft. Slice the cucumbers into ¼-inch rounds. If using larger cucumbers, you may want to slice them into ¼-inch planks or spears instead. Thinly slice the onion into half-moons. Place both in a large bowl.
Step 2: Salt and Ice Soak (30 minutes | Low intensity)
Sprinkle the kosher salt over the cucumbers and onions and toss to coat evenly. Add the ice cubes on top and let the mixture sit at room temperature for 30 minutes. The salt draws out excess water from the cucumbers, which is the secret to crisp pickles. The ice keeps them cold and firm. After 30 minutes, drain the mixture in a colander and rinse lightly under cold running water. Pat dry with paper towels or a clean kitchen towel.
Step 3: Make the Brine (5 minutes | Medium intensity)
While the cucumbers soak, combine the apple cider vinegar, sugar, water, mustard seeds, celery seeds, turmeric, red pepper flakes (if using), peppercorns, bay leaf, and garlic (if using) in a medium saucepan. Bring to a boil over medium-high heat, stirring occasionally, until the sugar dissolves completely. Reduce the heat and simmer for 2 minutes to bloom the spices. Remove from heat.
Step 4: Pack the Jars (3 minutes | Low intensity)
Pack the drained cucumbers and onions tightly into the sterilized quart jar (or divide between two pint jars). Pack them snugly but don’t crush them. If you have extra brine ingredients like the bay leaf or garlic, tuck them in among the cucumbers.
Step 5: Pour the Hot Brine (2 minutes | Low intensity)
Carefully pour the hot brine over the cucumbers, filling the jar to within ½ inch of the rim. Make sure the spices are distributed evenly. Tap the jar gently on the counter to release air bubbles. If the cucumbers aren’t fully submerged, add a splash more vinegar or water. Wipe the rim of the jar clean with a damp cloth and screw on the lid.
Step 6: Cool and Refrigerate (24 hours | Low intensity)
Let the jar cool to room temperature on the counter for about 1 hour, then transfer to the refrigerator. Refrigerate for at least 24 hours before eating — 48 hours is even better for full flavor development. The pickles will keep in the refrigerator for up to 1 month (and often longer).
Step 7: Serve and Store
Serve the pickles straight from the jar, or slice them into strips for sandwiches, chop them for relish, or pile them on burgers, hot dogs, and grilled cheese. Always use a clean fork or tongs to remove pickles from the jar to avoid contamination. Store the jar in the refrigerator, where the pickles will stay crisp for weeks.
Time and Intensity Summary
| Phase | Time | Intensity |
|---|---|---|
| Slicing cucumbers and onions | 10 minutes | Low |
| Salt and ice soak | 30 minutes | Low |
| Making the brine | 5 minutes | Medium |
| Packing jars | 3 minutes | Low |
| Pouring brine | 2 minutes | Low |
| Cooling | 1 hour | Low |
| Refrigerating | 24+ hours | None |
| Total active time | ~20 minutes | Easy |
Tips for the Best Pickles
-
Use fresh, firm cucumbers. Kirby (pickling) cucumbers are ideal because they’re dense and low in water. Avoid waxed cucumbers or any that feel soft.
-
Don’t skip the salt soak. It’s the most important step for crunch.
-
Slice thin. ¼-inch slices absorb the brine best. Thicker slices take longer to pickle.
-
Use 5% acidity vinegar. Apple cider vinegar is traditional, but white vinegar works too. Don’t use homemade vinegar — its acidity is unpredictable.
-
Let them sit. The flavor improves dramatically after 48 hours.
-
Keep them cold. These are refrigerator pickles — they must stay refrigerated.
Nutrition Information
Serving size: ¼ cup (about 1 ounce)
Servings per recipe: 16
| Nutrient | Amount per Serving |
|---|---|
| Calories | 35 |
| Total Fat | 0 g |
| Saturated Fat | 0 g |
| Trans Fat | 0 g |
| Cholesterol | 0 mg |
| Sodium | 220 mg |
| Total Carbohydrates | 8 g |
| Dietary Fiber | 0.5 g |
| Total Sugars | 7 g |
| Added Sugars | 6 g |
| Protein | 0.3 g |
| Vitamin C | 2% DV |
| Vitamin A | 1% DV |
| Calcium | 1% DV |
| Iron | 1% DV |