| Prep Time | 15 minutes |
| Infusion Time | 2–3 hours (low heat) or 2–3 weeks (cold infusion) |
| Cooling & Straining | 30 minutes |
| Total Time | ~3.5 hours (warm method) or 2–3 weeks (cold method) |
| Skill Level | Easy (Intensity: Low) |
| Yield | ~1 cup (240 ml) |
| Type | DIY Hair Care / Botanical Infusion |
| Method | Warm oil infusion |
Intensity Key: Low = simple measuring, gentle stirring; Moderate = careful temperature monitoring; High = rapid or precision work. This recipe is Low intensity throughout — the only thing that needs watching is the oil temperature.
Ingredients
For the Base Oil (choose one or blend)
-
¾ cup (180 ml) carrier oil — jojoba oil (closest to scalp’s natural sebum), sweet almond oil (light and nourishing), or coconut oil (deep conditioning; use fractionated if you prefer a liquid finish)
-
2 tbsp (30 ml) castor oil (optional — adds thickness and shine; skip if you have fine hair)
For the Aloe Vera Component
-
½ cup (about 1 large leaf, ~120 g) fresh aloe vera gel, scooped from the leaf — or ½ cup (120 ml) pure, preservative-free aloe vera gel
-
Note: Fresh aloe contains water, so this recipe uses a low-heat dehydration infusion to drive off moisture and prevent spoilage. See Step 3.
For the Botanical Boost (optional, choose 2–3)
-
2 tbsp dried hibiscus petals (strengthens and adds shine)
-
1 tbsp dried rosemary (stimulates the scalp and supports circulation)
-
1 tbsp dried nettle leaf (traditional hair-strengthening herb)
-
1 tsp fenugreek seeds (slippery elm–like slip; excellent for detangling)
For Preservation and Scent (optional)
-
10–15 drops rosemary or peppermint essential oil (also mildly antimicrobial)
-
5 drops tea tree essential oil (for flaky or oily scalps)
-
1 vitamin E capsule, pierced (antioxidant; extends shelf life)
Equipment
-
Small saucepan or double boiler
-
Fine-mesh strainer
-
Cheesecloth or muslin
-
Sterilized glass jar with tight-fitting lid (8 oz / 240 ml)
-
Funnel (optional)
-
Small airtight container for refrigerated aloe pulp (if any remains)
-
Thermometer (recommended)
Instructions
Step 1: Prepare the Aloe Gel — Time: 10 minutes | Intensity: Low
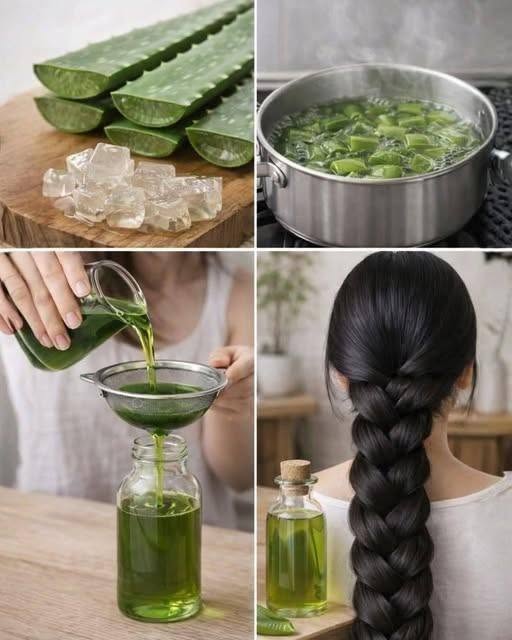
If using a fresh leaf, cut it at the base and stand it upright in a cup for 10 minutes to let the yellow latex drain out — this latex can irritate the scalp. Rinse the leaf, then fillet it: slice off the spiky edges, split the leaf lengthwise, and scoop out the clear gel with a spoon. Discard the green skin. Blend the gel briefly until smooth (or mash with a fork). Measure out ½ cup.
Tip: If using store-bought aloe gel, check the label — it must be pure aloe with no alcohol, colorants, or added water.
Step 2: Combine the Base Oil and Botanicals — Time: 5 minutes | Intensity: Low
Pour the carrier oil (and castor oil, if using) into a small saucepan or double boiler. Add the dried herbs and fenugreek seeds, if using. Warm over the lowest possible heat — you’re aiming for 110–120°F (43–49°C). The oil should feel warm to the touch but never hot, and it should never simmer or smoke. If you don’t have a thermometer, test a drop on your inner wrist: comfortably warm, like bathwater.
Intensity note: This is the only stage with any risk. Overheated oil degrades nutrients and can make the infusion rancid.
Step 3: Add the Aloe and Infuse Gently — Time: 2–3 hours | Intensity: Low–Moderate
Stir the aloe gel into the warm oil. Keep the heat at 110–120°F (43–49°C) and stir every 20–30 minutes. You’ll notice the aloe gradually releasing its moisture as tiny bubbles and a slight froth at the edges — this is exactly what you want. The oil will turn slightly cloudy and take on a pale green-gold tint.
Why the low heat? Aloe is roughly 99% water. Infusing it into oil at low heat slowly evaporates that water so the finished oil won’t spoil. Do not rush this with higher heat — you’ll fry the aloe and split the oil.
Cold-infusion alternative: If you’d rather not use heat, combine the oil and dried herbs only (skip the aloe) in a sealed jar, shake daily, and set in a sunny window for 2–3 weeks. Shake and strain as below. For the aloe version, the warm method is strongly recommended for safety.
Step 4: Check for Moisture — Time: 2 minutes | Intensity: Moderate
After 2 hours, tilt the pan and look closely. If you still see visible water droplets or active bubbling, continue infusing for another 30–45 minutes. The oil is ready when it looks uniform, slightly cloudy, and no longer bubbles at the edges.
Step 5: Cool and Strain — Time: 30 minutes + 5 minutes | Intensity: Low
Remove from heat and let the oil cool to room temperature — about 30 minutes. Meanwhile, sterilize your jar: wash in hot soapy water, rinse, and dry completely (or run through a dishwasher cycle). Line the fine-mesh strainer with two layers of cheesecloth and set it over a measuring cup. Pour the cooled oil through, then gather the cheesecloth and squeeze gently to extract every last drop. Discard the solids (compost them — they’re great for the garden).
Step 6: Add Essential Oils and Vitamin E — Time: 2 minutes | Intensity: Low
Stir in the essential oils and the pierced vitamin E capsule contents. Pour the finished oil into your sterilized jar using a funnel. Label with the date.
Step 7: Store — Time: 1 minute | Intensity: Low
Store in a cool, dark cupboard. Because this oil contains aloe, refrigerate it and use within 4–6 weeks. If you make the herb-only cold infusion (no aloe), it keeps at room temperature for up to 3 months. A vitamin E capsule helps extend shelf life but is not a preservative.
How to Use
-
Pre-wash treatment: Massage 1–2 teaspoons into the scalp and through the lengths. Leave for 30 minutes to overnight (use a shower cap), then shampoo out — you may need two rounds of shampoo.
-
Scalp massage: Warm a few drops between your palms and massage in circular motions for 5 minutes, 2–3 times weekly.
-
Frizz tamer: Rub a single drop between fingertips and smooth over dry ends.
-
Patch test first: Apply a small amount behind your ear or inner forearm and wait 24 hours before full use, especially if you have sensitive skin or allergies to herbs in the asteraceae family.
Tips for Success
-
Dry equals safe. Any residual water in the finished oil invites mold. When in doubt, infuse a little longer.
-
Never exceed 120°F (49°C). Low and slow is the whole game.
-
Use dried herbs, not fresh, for the botanicals — fresh herbs add water and shorten shelf life.
-
Sterilize everything that touches the finished oil.
-
Batch small. A cup lasts one person 2–3 months of regular use.
Nutrition & Composition (per 1 teaspoon / 5 ml serving — topical use)
This is a topical hair product, not a food. The values below describe its composition for reference; it is not intended for ingestion.
| Component | Amount per Teaspoon (approx.) |
|---|---|
| Calories | ~40 kcal (not for consumption) |
| Total Fat | ~4.5 g |
| Saturated Fat | ~0.5 g (higher if coconut oil is used) |
| Carbohydrates | <0.1 g |
| Protein | 0 g |