-
Prep Time: 15 Minutes
-
Cook Time: 10–12 Minutes
-
Chill Time: 20 Minutes
-
Total Time: 45–50 Minutes
-
Yield: 18–20 Cookies
-
Intensity Level: Intermediate (requires melting chocolate and managing dough consistency)
-
Cuisine: American / Dessert
Ingredients
For the Dry Mix
-
1 ¼ cups (160g) All-purpose flour
-
¼ cup (25g) Unsweetened cocoa powder (Dutch-processed recommended)
-
1 teaspoon Baking powder
-
½ teaspoon Salt
For the Wet Mix
-
8 oz (225g) Semi-sweet or dark chocolate, chopped (60% cacao recommended)
-
½ cup (115g) Unsalted butter
-
¾ cup (150g) Granulated sugar
-
¼ cup (50g) Brown sugar (packed)
-
2 Large eggs (room temperature)
-
1 teaspoon Vanilla extract
Add-ins (Optional)
-
½ cup Semi-sweet chocolate chips or chunks (for extra gooeyness)
-
½ cup Chopped walnuts or pecans
Equipment Needed
-
Saucepan and heatproof bowl (for a double boiler) OR a microwave-safe bowl
-
Electric hand mixer or stand mixer
-
Whisk
-
Spatula
-
Baking sheets
-
Parchment paper
-
Cookie scoop (optional but helpful)
Step-by-Step Instructions
Step 1: Preparation
Time: 5 Minutes | Intensity: Low
Preheat your oven to 350°F (175°C). Line two large baking sheets with parchment paper. If you only have one oven rack, prepare to bake in batches.
Step 2: Melt the Chocolate
Time: 5 Minutes | Intensity: Medium
In a heatproof bowl set over a pot of simmering water (double boiler), combine the chopped chocolate and butter. Stir constantly until melted and smooth. Alternatively, microwave in 30-second increments, stirring between each, until melted. Remove from heat and let it cool slightly for 5 minutes.
Step 3: Whisk the Sugars and Eggs
Time: 3 Minutes | Intensity: High
In a large bowl, combine the granulated sugar, brown sugar, and eggs. Using an electric mixer, beat on high speed for 2–3 minutes. The mixture should become pale, thick, and fluffy. This step is crucial for developing the shiny, crackly crust (the “crinkle” top).
Step 4: Combine the Wet Ingredients
Time: 2 Minutes | Intensity: Low
Beat in the vanilla extract. Gradually pour the slightly cooled melted chocolate mixture into the egg mixture while the mixer is running on low speed. Mix until fully incorporated. Be careful not to over-mix.
Step 5: Add the Dry Ingredients
Time: 2 Minutes | Intensity: Low
In a separate small bowl, whisk together the flour, cocoa powder, baking powder, and salt. Add this dry mixture to the wet chocolate batter. Fold gently with a spatula until just combined. Do not overmix. If you are using chocolate chips or nuts, fold them in now.
Step 6: Chill the Dough (Optional but Recommended)
Time: 20 Minutes | Intensity: Low
For thicker, fudgier cookies, cover the bowl and chill in the refrigerator for 20 minutes. If you prefer a flatter cookie, you can skip this step. However, chilling prevents the cookies from spreading too much and intensifies the flavor.
Step 7: Scoop and Bake
Time: 12 Minutes | Intensity: Medium
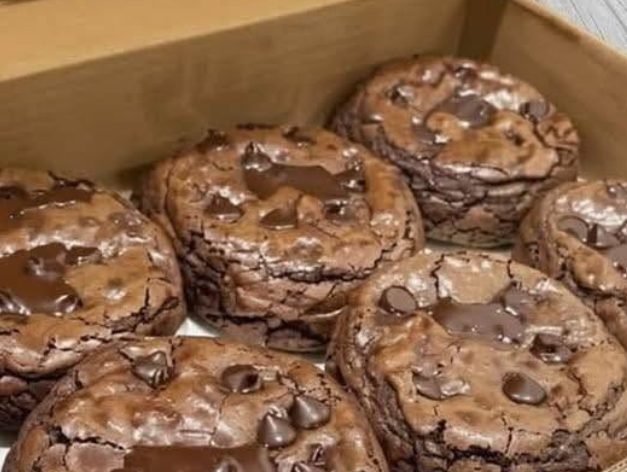
Scoop the dough onto the prepared baking sheets using a 2-tablespoon scoop, spacing them about 2 inches apart. Bake one sheet at a time for 10–12 minutes. Visual Cue: The cookies are done when the edges are set but the centers still look soft and slightly underbaked. They will continue to cook on the hot sheet.
Step 8: Cool
Time: 10 Minutes | Intensity: Low
Let the cookies cool on the baking sheet for 5–10 minutes before transferring them to a wire rack to cool completely. This allows the structure to set so they don’t fall apart.
Recipe Summary Table
| Phase | Activity | Time | Intensity |
|---|---|---|---|
| Prep | Mixing Dry Ingredients & Preheating | 5 Min | Low |
| Melting | Melting Chocolate & Butter | 5 Min | Medium |
| Whipping | Beating Eggs & Sugar (Ribbon Stage) | 3 Min | High |
| Mixing | Combining Wet & Dry Ingredients | 4 Min | Low |
| Chilling | Resting Dough in Fridge | 20 Min | Low |
| Baking | Baking Cookies | 10-12 Min | Medium |
| Cooling | Resting on Sheet & Wire Rack | 10 Min | Low |
Tips for Success
-
Room Temperature Eggs: Eggs at room temperature whip up much better than cold eggs, creating that classic shiny crust.
-
Watch the Clock: Because these cookies are dark in color, it is hard to tell when they are “golden brown.” Rely on the texture of the edges rather than the color. If the edge is firm, it is done.
-
Do Not Overmix: Once the flour goes in, stop mixing as soon as you see no dry streaks. Overmixing develops gluten, which makes the cookies tough rather than fudgy.
-
The “Ribbon” Stage: When beating the eggs and sugar, the mixture should fall off the beater in a thick ribbon that slowly dissolves back into the bowl. This indicates proper aeration.
Nutritional Information
Disclaimer: The following nutritional estimate is based on the recipe making 20 cookies. It does not include optional add-ins like nuts or extra chocolate chips.
-
Serving Size: 1 Cookie (approx. 30g)
-
Calories: 145 kcal
-
Total Fat: 8g (Saturated Fat: 4.5g)
-
Total Carbohydrates: 18g (Dietary Fiber: 1g, Sugars: 12g)
-
Protein: 2g
-
Sodium: 45mg
-
Cholesterol: 25mg