| Prep Time | 20 minutes |
| Cook Time | 15 minutes (stovetop) + 20–30 minutes (canner processing) |
| Total Time | ~1 hour 15 minutes |
| Skill Level | Moderate (Intensity: Moderate) |
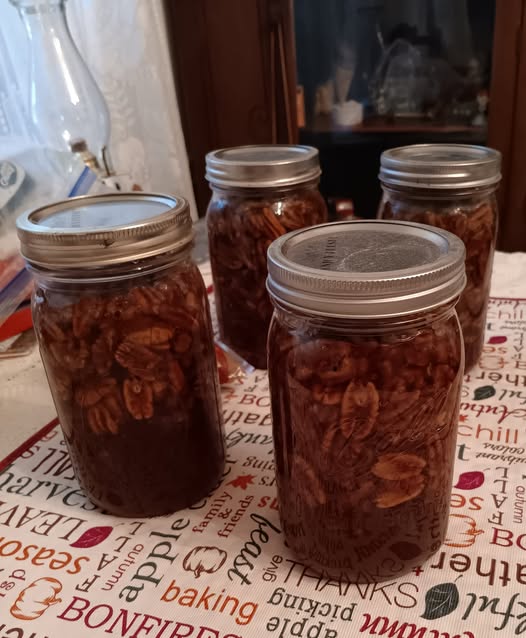
| Yield | 4 pint jars (16 oz each) — enough for about 4 pies |
| Cuisine | American / Southern |
| Method | Stovetop cook + boiling-water or pressure canning |
Intensity Key: Low = simple measuring and stirring; Moderate = attention needed at the stove or canner; High = rapid, precise, or safety-critical work. This recipe is Moderate intensity — the filling comes together quickly, but canning requires steady attention to temperature and timing.
⚠️ Important Safety Note — Read Before You Start
Home-canned pecan pie filling is a high-risk product. Pecans are a low-acid food, and eggs and butter (common in pie filling) cannot be safely canned at home — never add eggs or dairy to a home-canned filling. This recipe uses a pressure canner and relies on the natural acidity of the sugar syrup and vinegar/lemon juice to help preserve the filling safely. Do not substitute a boiling-water canner unless your tested recipe explicitly allows it. Follow USDA or manufacturer-tested processing times for your altitude and jar size, and when in doubt, refrigerate or freeze the filling instead of canning it. If you are new to canning, use a tested recipe from the USDA Complete Guide to Home Canning or the National Center for Home Food Preservation.
Ingredients
For the Filling (makes ~4 pints)
-
4 cups (480 g) pecan halves or chopped pecans
-
2 cups (400 g) granulated sugar
-
1 cup (200 g) packed light brown sugar
-
3 tbsp cornstarch
-
1½ cups (360 ml) light corn syrup
-
½ cup (120 ml) water
-
2 tbsp lemon juice or apple cider vinegar (for acidity)
-
1 tsp salt
-
2 tsp vanilla extract
-
1 tsp ground cinnamon
-
¼ tsp ground nutmeg
-
2 tbsp unsalted butter (added only if freezing, not canning — see note)
Equipment
-
Large heavy-bottomed saucepan or Dutch oven
-
Wooden spoon or silicone spatula
-
Candy or instant-read thermometer
-
4 sterilized pint jars, lids, and bands
-
Jar lifter, funnel, and bubble remover
-
Pressure canner (or freezer containers, if not canning)
-
Clean kitchen towels
-
Ladle
Instructions
Step 1: Sterilize the Jars — Time: 10 minutes | Intensity: Low
Wash jars, lids, and bands in hot soapy water and rinse well. Keep jars hot in a 200°F (95°C) oven or in a pot of simmering water until ready to fill. Lids should be kept in hot (not boiling) water.
Intensity note: Sterilization is simple but non-negotiable — clean equipment is the foundation of safe canning.
Step 2: Toast the Pecans — Time: 5 minutes | Intensity: Moderate
Spread the pecans on a dry skillet over medium heat and toast for 3–5 minutes, stirring frequently, until fragrant and lightly golden. Watch closely — pecans go from toasted to burnt in under a minute. Transfer to a plate to cool.
Intensity note: This is a high-attention step. Stay at the stove and keep the nuts moving.
Step 3: Combine the Sugars and Cornstarch — Time: 2 minutes | Intensity: Low
In your large saucepan, whisk together the granulated sugar, brown sugar, cornstarch, salt, cinnamon, and nutmeg until evenly blended. Breaking up any brown sugar lumps now prevents clumps later.
Step 4: Add the Liquids — Time: 2 minutes | Intensity: Low
Pour in the corn syrup, water, and lemon juice. Stir with a wooden spoon until the dry ingredients are fully dissolved and the mixture is smooth and uniform.
Step 5: Cook the Syrup — Time: 8–10 minutes | Intensity: Moderate
Set the saucepan over medium heat and bring the mixture to a gentle boil, stirring constantly. Once boiling, reduce to medium-low and simmer for 5–7 minutes, stirring frequently, until the syrup thickens enough to coat the back of a spoon — about 220°F (104°C) on an instant-read thermometer. Do not let it reach a hard-ball stage — you want a pourable filling, not candy.
Intensity note: This is the most demanding stovetop stage. Stir constantly, keep the heat moderate, and watch the thermometer — sugar scorches fast.
Step 6: Add the Pecans and Vanilla — Time: 2 minutes | Intensity: Low
Remove the pan from the heat and stir in the vanilla extract and the toasted pecans. Stir until the pecans are evenly coated in the thickened syrup. The filling will look loose but will thicken further as it cools.
Step 7: Fill the Jars — Time: 8 minutes | Intensity: Moderate
Ladle the hot filling into the hot sterilized jars, leaving ½ inch (1 cm) of headspace. Use a funnel to keep the rims clean. Run a bubble remover or thin spatula around the inside of each jar to release trapped air, then wipe the rims with a damp clean cloth. Apply lids and bands until fingertip-tight — snug, not cranked down.
Intensity note: Work quickly while the filling is hot, and keep everything clean. A greasy rim means a failed seal.
Step 8: Process in the Pressure Canner — Time: 20–30 minutes (+ venting and cooling) | Intensity: High
Place the filled jars in your pressure canner according to the manufacturer’s instructions. Process pints for 20 minutes (quarts for 25 minutes) at 10 PSI, adjusting for altitude per your canner’s manual — always defer to your canner manufacturer’s tested time and pressure for pecan pie filling. Let the canner depressurize naturally — never force-cool it — then wait 5 minutes before opening.
Intensity note: This is the safety-critical stage. Follow the manual exactly, keep the pressure steady, and do not improvise.
Step 9: Cool and Check Seals — Time: 12–24 hours | Intensity: Low
Lift jars out with a jar lifter and set them on a towel-lined counter, spaced 1 inch apart, undisturbed for 12–24 hours. Check seals by pressing the center of each lid — it should be concave and stay down. Remove bands, wipe jars, label with the date, and store in a cool, dark place. Any jar that didn’t seal should be refrigerated and used within 1 week.
Step 10: Using the Filling — Time: 2 minutes | Intensity: Low
To make a pie: pour one pint of filling into a 9-inch unbaked pie crust, dot with 1 tablespoon butter (optional), top with a second crust or a lattice, and bake at 375°F (190°C) for 40–45 minutes, until the crust is golden and the filling is bubbling. (If your canned filling is egg-free, the pie bakes up a little looser than a classic custard pie — let it cool fully to set.)
Tips for Success
-
Never add eggs or dairy to home-canned filling. Eggs and butter are not safe for shelf-stable canning — add them fresh when you bake the pie.
-
Use a pressure canner, not a water-bath canner, unless your tested recipe says otherwise.
-
Don’t over-thicken the syrup. Aim for pourable; it sets up in the pie.
-
Freezer alternative (easier and safer): Skip canning entirely. Stir 2 tablespoons melted butter into the cooled filling, ladle into freezer containers, and freeze for up to 3 months. Thaw overnight in the fridge.
-
Altitude matters. Adjust pressure and time per your canner manual.
-
Label everything with the date and contents.
Nutrition (per ¼ cup serving of filling, approx. 1/16 of a pint)
Estimates only. Values vary by brand, portion size, and whether served with crust.
| Nutrient | Amount per ¼ cup |
|---|---|
| Calories | ~230 kcal |
| Total Fat | ~11 g |
| Saturated Fat | ~1 g |
| Carbohydrates | ~32 g |
| Fiber | ~1.5 g |
| Sugars | ~27 g |
| Protein | ~2 g |
| Sodium | ~75 mg |
| Cholesterol | 0 mg |