Prep Time: 20 minutes | Chill Time: 30 minutes | Bake Time: 12–14 minutes per batch | Total Time: ~1 hour 15 minutes
Yield: About 40 cookies | Difficulty: Easy | Intensity Level: Low (light mixing, no special equipment)
Why You’ll Love This Recipe
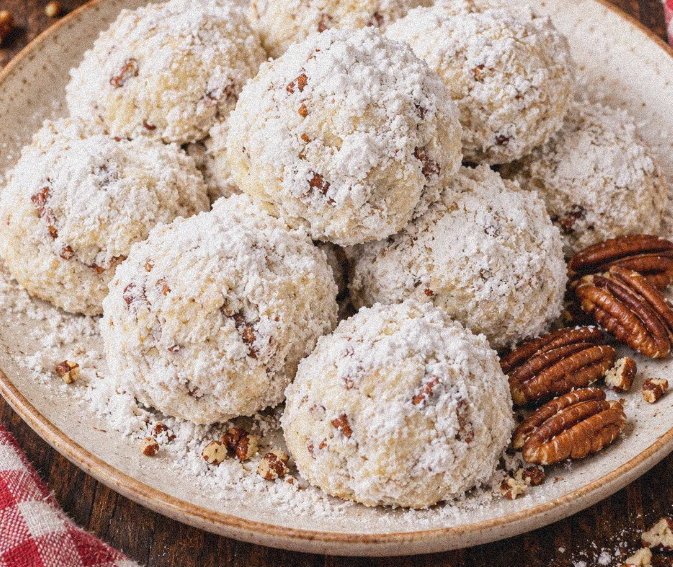
Old-fashioned snowball cookies are the quiet hero of every holiday cookie platter. Known by many names — Russian tea cakes, Mexican wedding cookies, butterballs — these tender, powdery little spheres are made from just six simple ingredients most bakers already have on hand. They’re buttery and nutty, with a delicate crumb that quite literally melts in your mouth, and their snowy coating of powdered sugar makes them look like tiny edible snowballs.
What makes this recipe truly special is its simplicity. There’s no creaming butter and sugar for ages, no chilling dough overnight, and no fancy decorating. The dough comes together in one bowl, chills briefly while your oven preheats, and bakes in under fifteen minutes. The signature double-coating of powdered sugar — once while warm, once when cool — gives these cookies their unmistakable snowy finish and sweet, melt-away exterior.
They’re also wonderfully versatile. Traditional recipes call for finely chopped pecans or walnuts, but you can swap in almonds, hazelnuts, or even leave the nuts out entirely for a nut-free version (just increase the flour slightly). Whether you’re baking for a cookie exchange, a holiday gathering, or simply a cozy afternoon treat with tea, these snowball cookies deliver old-fashioned comfort with minimal effort.
Ingredients
For the Cookies:
-
1 cup (2 sticks / 227 g) unsalted butter, softened to room temperature
-
½ cup (60 g) powdered sugar (confectioners’ sugar)
-
1 teaspoon vanilla extract
-
¼ teaspoon salt (omit if using salted butter)
-
2¼ cups (280 g) all-purpose flour
-
¾ cup (85 g) finely chopped pecans or walnuts (see notes for substitutions)
For the Coating:
-
1½ cups (180 g) powdered sugar, divided (you’ll use it in two stages)
Optional Flavor Variations:
-
½ teaspoon almond extract (in place of or alongside vanilla)
-
1 tablespoon finely grated orange zest
-
¼ teaspoon ground cinnamon stirred into the coating sugar
Equipment
-
Large mixing bowl
-
Electric mixer (hand or stand) or a sturdy wooden spoon
-
Measuring cups and spoons
-
Rubber spatula
-
Plastic wrap
-
Two baking sheets
-
Parchment paper or silicone baking mats
-
Small bowl (for coating sugar)
-
Wire cooling rack
Step-by-Step Instructions
Step 1: Prepare Your Ingredients (5 minutes)
Set your butter out at least 30 minutes ahead so it’s truly soft — it should indent easily when pressed but not be greasy or melted. Finely chop your nuts; you want pieces no larger than a small pea so the cookies slice cleanly and hold together. Preheat your oven to 350°F (175°C) and line two baking sheets with parchment paper. (If your kitchen is warm, hold off on preheating until after the dough chills.)
Step 2: Mix the Butter and Sugar (3–4 minutes)
In a large bowl, beat the softened butter and ½ cup powdered sugar together on medium speed until light and fluffy, about 2–3 minutes. Scrape down the sides of the bowl. Beat in the vanilla extract and salt until combined. Intensity note: This is the most vigorous mixing step in the recipe — medium speed is plenty. Over-mixing at this stage can incorporate too much air and cause the cookies to spread.
Step 3: Add the Flour and Nuts (2–3 minutes)
Reduce the mixer to low speed and gradually add the flour, mixing just until the dough comes together and no dry streaks remain. Fold in the chopped nuts with a rubber spatula. The dough should be soft but not sticky — it should hold together when you pinch a piece. Intensity note: Low speed and a light hand here keep the cookies tender. Stop mixing the moment the flour disappears.
Step 4: Chill the Dough (30 minutes)
Divide the dough in half, shape each half into a flat disk, wrap tightly in plastic wrap, and refrigerate for 30 minutes. This brief chill firms the butter, making the dough easier to roll and helping the cookies hold their round shape in the oven. Don’t skip this step — warm dough leads to flat, spreading snowballs.
Step 5: Shape the Cookies (10–12 minutes)
Scoop the dough into 1-tablespoon portions (a small cookie scoop works beautifully) and roll each into a smooth ball between your palms. Place them about 1½ inches apart on the prepared baking sheets — they barely spread, so you can fit 18–20 per sheet. If the dough becomes sticky while you work, pop it back in the fridge for 10 minutes.
Step 6: Bake (12–14 minutes per batch)
Bake one sheet at a time on the center rack for 12–14 minutes, until the cookies are set and the bottoms are just barely golden. The tops should remain pale — these are not meant to brown. Intensity note: Rotate the pan halfway through baking for even color. Oven temperatures vary, so check at the 11-minute mark the first time you make these.
Step 7: First Sugar Coating (2–3 minutes)
While the cookies bake, place ¾ cup powdered sugar in a small bowl. As soon as the cookies come out of the oven, let them rest on the sheet for 3–4 minutes — just until cool enough to handle — then roll each warm cookie gently in the sugar to coat. Set coated cookies on a wire rack. The warmth helps the sugar cling and creates a slightly glazed first layer.
Step 8: Second Sugar Coating (2–3 minutes)
Once the cookies are completely cool (about 20 minutes), roll them a second time in the remaining ¾ cup powdered sugar. This double-dip is the secret to that thick, snowy, bakery-style finish. Arrange on a platter and serve.
Storage & Make-Ahead
-
Room temperature: Store in an airtight container for up to 1 week. If stacking, separate layers with parchment; re-roll in powdered sugar before serving if desired.
-
Freezer (baked): Freeze coated cookies in an airtight container for up to 3 months. Thaw at room temperature and refresh with a dusting of powdered sugar.
-
Freezer (dough): Roll dough into balls, freeze on a sheet until solid, then transfer to a freezer bag for up to 3 months. Bake from frozen, adding 2–3 minutes to the bake time.
-
Make-ahead tip: These cookies actually improve after a day as the flavors meld — perfect for holiday prep.
Recipe Notes & Variations
-
Nut-free version: Omit the nuts and increase the flour to 2⅓ cups. The cookies will be slightly more delicate but still delicious.
-
Nut substitutions: Almonds, hazelnuts, or walnuts all work well. Toast them for 5–7 minutes at 350°F and cool completely before chopping for deeper flavor.
-
Butter matters: Use real unsalted butter — margarine or spreads will change the texture and taste.
-
Measuring flour: Spoon flour into your measuring cup and level it off. Packed flour makes dry, crumbly cookies.
-
Pale is perfect: If your cookies brown, the oven is too hot or they baked too long. Pull them at the first hint of color on the bottoms.
Nutrition Information (Per Cookie, Based on 40 Cookies)
Values are estimates and will vary with ingredient brands and portion sizes.
| Nutrient | Amount |
|---|---|
| Calories | ~95 kcal |
| Total Fat | 6.5 g |
| Saturated Fat | 3.5 g |
| Cholesterol | 14 mg |
| Sodium | 15 mg |
| Total Carbohydrates | 9 g |
| Sugars | 4 g |
| Protein | 1 g |