-
Prep Time: 30 minutes
-
Chill Time: 4 hours (or overnight)
-
Total Time: 4 hours 30 minutes
-
Recipe Intensity: Low (No-bake, minimal cooking skills required, just simple assembly)
The Anatomy of a Heavenly Cake
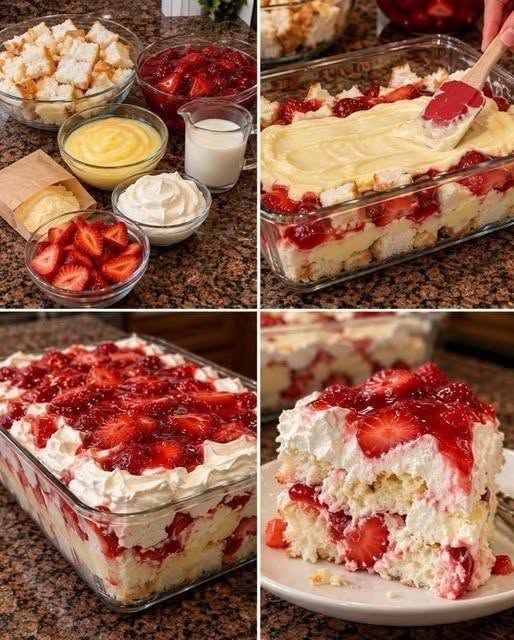
Before we start, let’s understand the beautiful layers that make up this cake. From bottom to top:
-
The Base: Cubed, light-as-air angel food cake. It’s the perfect sponge to soak up all the creamy goodness.
-
The Creamy Layer: A luscious, velvety mixture of instant vanilla pudding and cold milk, folded together with Cool Whip (or stabilized whipped cream) for an extra airy texture.
-
The Fruit: Macerated fresh strawberries. We’ll toss them in a little sugar to draw out their natural juices, creating a sweet, glossy syrup that seeps into the cake.
-
The Crown: A final, generous layer of Cool Whip, swirled beautifully.
-
The Garnish: More fresh strawberries and a sprinkle of sparkly sanding sugar or crushed graham crackers for a touch of texture and visual appeal.
Ingredients
For the Cake & Cream:
-
1 (14-16 oz / 400-450g) prepared Angel Food Cake (store-bought is perfect for this recipe)
-
2 (3.4 oz / 96g) boxes Instant Vanilla Pudding Mix
-
3 cups (720ml) whole milk, cold
-
1 (16 oz / 453g) tub frozen whipped topping (like Cool Whip), thawed
-
1 (8 oz / 226g) block cream cheese, softened to room temperature
For the Strawberry Filling & Topping:
-
2 lbs (approx. 900g) fresh strawberries, hulled and sliced
-
1/4 cup (50g) granulated sugar
-
1 teaspoon vanilla extract
-
Optional Garnish: A few extra whole strawberries, a light dusting of sanding sugar, or a sprinkle of crushed graham crackers.
Step-by-Step Instructions with Time & Intensity
Part 1: The Strawberry Prep
Time: 10 minutes
Intensity: Low
What it involves: Slicing and macerating the strawberries.
-
Wash and hull your fresh strawberries. Slice them into 1/4-inch thick slices. You should have about 4-5 cups of sliced berries.
-
In a medium bowl, combine the sliced strawberries, granulated sugar, and vanilla extract. Gently toss to coat all the berries.
-
Set the bowl aside. As the strawberries sit, the sugar will draw out their natural juices, creating a beautiful, sweet syrup. This is a crucial step that prevents the cake from being dry.
Part 2: Building the Creamy Base
Time: 10 minutes
Intensity: Medium-Low
What it involves: Using a hand mixer to create a smooth, lump-free cream cheese and pudding mixture.
-
In a large mixing bowl, beat the softened cream cheese with an electric hand mixer on medium speed until it’s smooth and free of lumps, about 1-2 minutes.
-
Add the two boxes of instant vanilla pudding mix and the cold milk. Beat on low speed for 1-2 minutes until it just starts to come together, then increase to medium speed and beat for another 2 minutes until the mixture is thick and smooth.
-
Gently fold in the thawed whipped topping (reserving about 1 cup for the final layer) using a spatula until no white streaks remain. The mixture should be light, fluffy, and completely combined. Do not overmix, as this can deflate the cream.
Part 3: The Assembly
Time: 10 minutes
Intensity: Low
What it involves: Layering the ingredients in the pan.
-
Lightly grease a 9×13-inch baking dish.
-
Layer 1: Tear the angel food cake into bite-sized (1-2 inch) chunks and spread them in an even layer on the bottom of the prepared baking dish.
-
Layer 2: Spoon half of the creamy pudding mixture over the cake cubes. Use an offset spatula or the back of a spoon to spread it into an even layer, gently pressing it down into the nooks and crannies.
-
Layer 3: Using a slotted spoon, arrange half of the macerated strawberries in a single layer over the cream mixture. Be sure to leave the excess strawberry syrup in the bowl for now.
-
Repeat Layers: Add the remaining cake cubes on top, then the rest of the pudding mixture. Finally, top with the remaining strawberries.
-
The Crown: Dollop the reserved 1 cup of whipped topping over the final layer of strawberries and spread it gently to cover the entire surface.
Part 4: The Chill (The Most Important Step)
Time: 4 hours (or up to 24 hours)
Intensity: None (This is a waiting game!)
What it involves: The magic of refrigeration. This allows the cake to set, the pudding to firm up, and the flavors to meld together into one cohesive, heavenly dessert. The cake cubes will absorb the moisture from the cream and strawberry syrup, creating the perfect tender texture.
-
Cover the baking dish tightly with plastic wrap.
-
Refrigerate for a minimum of 4 hours. For the best flavor and texture, chill it overnight.
Part 5: The Final Touch & Serving
Time: 5 minutes
Intensity: Low
What it involves: Garnishing and serving. This is the victory lap!
-
Just before serving, drizzle the reserved strawberry syrup (from macerating) lightly over the top of the cake.
-
Garnish with a few extra fresh strawberries and a light sprinkle of sanding sugar or crushed graham crackers, if desired.
-
When you’re ready to serve, cut the cake into generous squares. Use a knife that you’ve dipped in warm water and wiped clean between each cut for perfect slices. This cake is soft, so a clean knife makes all the difference.
Nutrition Information (Per Serving)
This recipe is designed to be a treat. The nutrition information below is an estimate and will vary depending on the specific brands of ingredients you use. It is calculated based on 12 servings.
-
Calories: Approximately 350-400 kcal
-
Total Fat: 15-18g
-
Saturated Fat: 12-14g
-
Cholesterol: 20-25mg
-
Sodium: 350-400mg
-
Total Carbohydrates: 50-55g
-
Dietary Fiber: 1-2g
-
Total Sugars: 35-40g (includes added sugar from pudding, whipped topping, and granulated sugar)
-
Protein: 4-5g